Overview Tab Interface Documentation #
The Overview tab provides a comprehensive summary of your content plan and displays key settings needed to manage it. This documentation details each element on the screen, what settings are available, and how to interact with them.
1. Page Header and Introduction #
- Header Title:
At the very top, you will see the main title, “Content Plan Management,” indicating that you are in the content plan management section. - Subtitle/Introduction:
A brief description explains that this page allows you to manage your content plan. For example:
“This page allows you to manage your content plan. You can add new topics, update existing ones, and clear the entire plan if needed.”
This informs you that you can create, update, and even delete topics within your content plan.
2. Navigation Tabs #
Just below the header, there is a horizontal menu with several tabs that let you switch between different sections of the content plan:
- Overview: (Active Tab)
Displays a summary of your content plan. - Categories:
Provides settings for each category (such as frequency of posts, assigned author, status, etc.). - Generation:
Allows you to start, stop, and monitor the article generation process.
3. Status Information and Digital Clock #
Beneath the tabs, you’ll find key status indicators and a digital clock:
- Generation Status:
- Status Indicator: A colored dot and text display whether the generation process is running (“Running”) or stopped (“Stopped”).
- Tooltip: Hovering over this area shows a tooltip with details about the next scheduled article (including its title and the time remaining until publication).
- Details Link: A link labeled “Details” allows you to quickly navigate back to the Overview tab for more information.
- Digital Clock:
- Date Block: Shows the current day of the week and date (for example, “Mon, 15 Mar”).
- Time Block: Displays the current hours, minutes, and seconds. This real-time clock helps you track the current time as you manage your schedule.
4. Selected Categories Summary #
If you have selected one or more categories for your content plan, this section provides a quick summary:
- Category List:
Each selected category is listed with its name and its set frequency (e.g., “3 posts/week”).
This summary gives you a snapshot of which categories are included in your plan and the posting frequency for each.
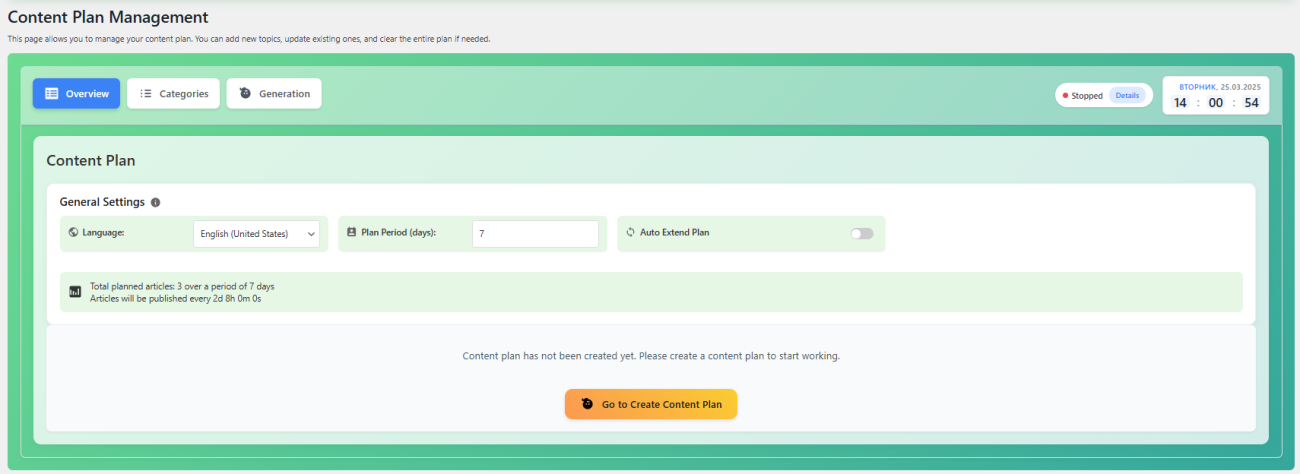
5. General Settings Block #
Below the categories summary is the General Settings block, which contains core settings for your content plan:
- Language Selection:
A dropdown menu lets you choose the language in which the content will be generated. This ensures that the content is appropriate and relevant to your target audience. - Plan Period:
A numeric input field allows you to set the duration (in days) of your content plan—from 1 to 365 days—depending on your strategy. - Auto Extend Plan:
A toggle switch enables you to automatically extend the content plan after the current period ends. When activated, this option maintains a continuous flow of content without manual intervention. - Plan Statistics:
A statistics section provides:- Total Planned Articles: Displays the total number of articles scheduled over the selected period (for example, “Total planned articles: 15 over a period of 7 days”).
- Publication Interval: Indicates the calculated interval between articles (e.g., “Articles will be published every 11 hours”).
6. Content Plan Management Controls #
Further down, you will find controls to manage the content plan:
- Start/Stop Article Generation:
A button that lets you start or stop the article generation process.- The button icon toggles between a “Play” and “Pause” symbol, and the button text updates accordingly based on the current state.
- Update Plan:
If there are existing entries in your content plan, this button allows you to update (or regenerate) the plan, adjusting topics or publication times as necessary. - Load Content Plan:
A button that enables you to load a previously saved content plan from a file. If such a file exists, you will be prompted to migrate the file data to the database. - Content Plan Table:
A detailed table that lists all scheduled articles with the following columns:- Number: The row number.
- Category: The name of the category for each article.
- Article Topic: The generated title for the article.
- Keyword: The keyword or key phrase associated with the article.
- Publish Date & Time: The scheduled publication date and time.
- Status: The current status (e.g., Waiting, Published, Generated, Missed).
- Actions: Buttons for editing, deleting, replacing, or manually triggering article generation.
- Additional Controls:
Under the table, there are extra buttons for:- Add New Topic: Manually add a new article topic to your content plan.
- Clear Content Plan: Delete all items from your content plan to start over.
7. Tooltips and Additional Elements #
- Tooltips:
Hovering over info icons (usually represented by an “i” or question mark) displays tooltips that provide more details about each setting (for example, explanations for “Auto Extend Plan” or “Frequency”). - Preloader:
When you start generating content, a preloader appears, showing:- Generating Content… as a heading.
- Dynamic Subheading: Displays changing tip messages.
- Timer: Shows a countdown for the generation process.
- Animated Loader: Animated dots indicate that the process is ongoing.
- Auto-Save Overlay and Popup:
A small overlay popup confirms that your settings have been auto-saved. - Import Content Plan Popup:
A dedicated popup window that lets you import a content plan from a file (CSV or TXT) or manually enter data. This popup also includes options to either replace the existing plan or add to it.
Summary #
The Overview tab of the Content Plan interface is designed to give you a complete snapshot of your content generation schedule. It includes summary information on selected categories and their frequencies, general settings such as language, plan period, and auto-extension, and detailed controls for starting, stopping, updating, and importing your content plan. This comprehensive overview ensures you can efficiently manage your content strategy from a single screen.


