This documentation page explains the Image Settings tab within the AI Content Wizard plugin. In this section, you can customize how the plugin generates images to complement your content. The settings available vary depending on the selected image model. Each model offers different options for size, quality, and style. Adjust these options to meet your visual requirements and optimize your cost.
Image Settings – AI Image Generation Options #
Overview #
The Image Settings tab controls the visual output of your generated content. Depending on the selected image model, the available options (size, quality, and style) adjust dynamically. Use these settings to fine-tune the appearance of generated images so that they blend seamlessly with your brand and content style.
Note: If you’re using DALL‑E (OpenAI) models, you won’t see a separate API key field here, since it shares the same API key as the text models. Other providers (DeepAI, Stable Diffusion, Ideogram) have dedicated API keys with unique pricing and subscription options.
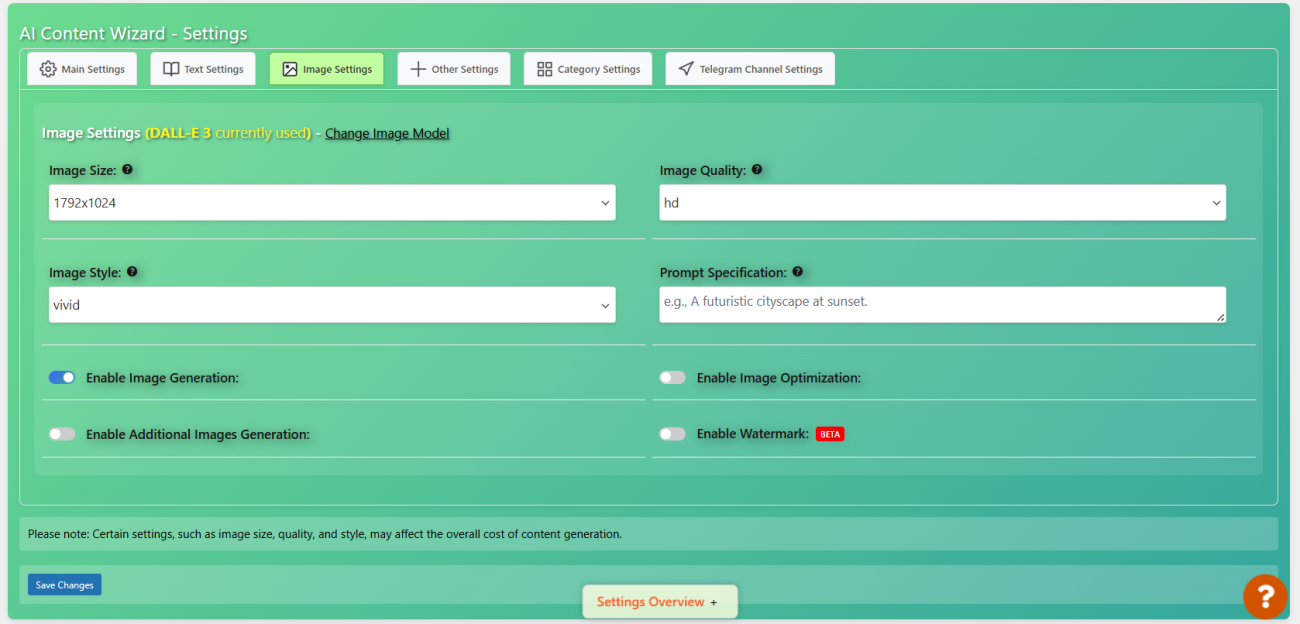
1. Image Size #
- Image Size:
Choose the dimensions for your generated images.- DALL‑E 2: Options include 256×256, 512×512, and 1024×1024 pixels.
- DALL‑E 3: Offers sizes such as 1024×1024, 1792×1024, and 1024×1792 pixels.
- DeepAI Models: Provide various options like 1024×576, 768×1024, and more.
- Stable Diffusion: Uses aspect ratios (e.g., 16:9, 1:1) rather than fixed pixel sizes.
- Ideogram Models: Use either aspect ratios (V1) or resolution settings (V2) based on your selected option.
Select a size that best suits your design needs and display context. Keep in mind that higher resolutions may incur higher generation costs.
2. Image Quality #
- Image Quality:
This setting adjusts the clarity and resolution quality of the generated images.- For example, DALL‑E 3 allows standard or HD quality.
- DeepAI and other providers offer standard or HD (and sometimes ultra) quality settings.
- Stable Diffusion and Ideogram models typically adjust quality automatically based on other parameters.
Higher quality images may consume more tokens or credits, so choose based on your visual requirements and budget.
3. Image Style #
- Image Style:
Customize the artistic style of your generated images:- DALL‑E Models: Options such as natural or vivid.
- DeepAI HD: May offer a stylized option.
- SDXL 1.0: Provides multiple styles like 3D Model, Analog Film, Anime, Cinematic, Comic Book, Digital Art, Fantasy Art, and more.
- Stable Diffusion: Offers styles such as photorealistic and artistic.
- Ideogram Models (V2): Allow selection among styles like Auto, General, Realistic, Design, Render 3D, or Anime.
Select a style that aligns with your brand’s visual identity or the mood you want to convey in your content.
4. Prompt Specification #
- Prompt Specification:
Here you can enter a brief description or extra instruction to guide the image generation process. For example, you might specify:- “A futuristic cityscape at sunset”
- “An impressionist painting of a forest”
- “A digital art rendition in a vibrant style”
This prompt refines the context for the AI, ensuring that the generated image accurately reflects your intended visual theme.
Special Considerations #
- Dynamic Options:
The available options for size, quality, and style automatically update based on your selected image model. This ensures that you are presented with choices that are compatible with your chosen provider. - Cost and Subscription:
- For providers like DeepAI and Stable Diffusion, pricing may vary based on the selected quality and style.
- Some providers offer subscription models that reduce the per-image cost when you opt for a monthly plan.
- DALL‑E models share the API key with text models, so their pricing and subscription details are managed through your OpenAI account.
- Provider-Specific Details:
Refer to the following documentation for provider-specific instructions on obtaining API keys and detailed pricing information:
Additional Image Options #
In addition to the core image parameters (size, quality, and style), the AI Content Wizard plugin offers several advanced options for fine-tuning your image outputs. These settings allow you to further optimize the appearance and cost-effectiveness of your generated images.
1. Image Optimization #
- Enable Image Optimization:
- This toggle allows you to enable an optimization process that automatically compresses or optimizes images after generation.
- Purpose: Optimized images load faster and may help reduce bandwidth usage.
- Note: While optimization can improve site performance, it may slightly alter image details.
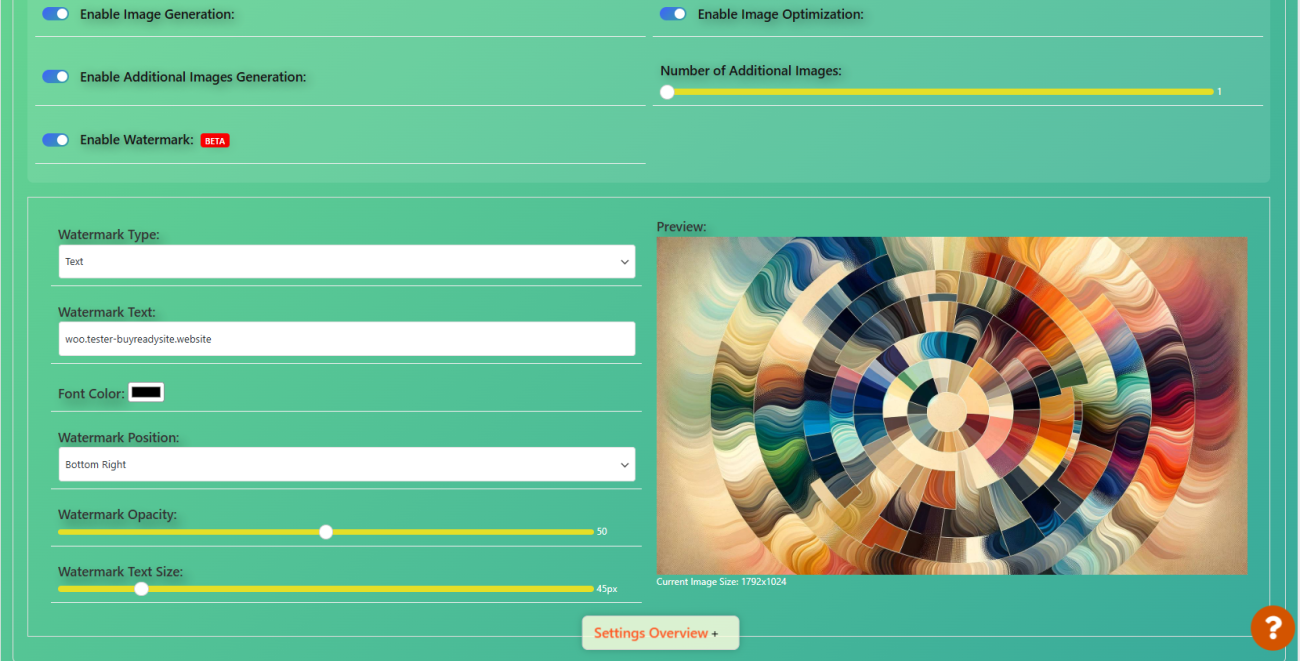
2. Additional Images Generation #
- Enable Additional Images Generation:
- This option enables the creation of extra images in addition to your main generated image.
- Use Case: Ideal for generating galleries or multiple visual elements for a single content piece.
- Number of Additional Images:
- A range selector allows you to choose how many extra images (from 1 to 10) will be generated.
- Cost Consideration: More images may increase the overall cost of image generation.
3. Media Attachments for Telegram Messages #
- Attach Media to Telegram Messages:
- When enabled, any generated media (images, videos, audio) will be attached to your Telegram notifications.
- Media Attachments Mode:
- Featured Image Only: Only the featured image will be attached.
- All Media: All media files from the post will be sent as a gallery.
- Use Case: This setting is useful if you want to provide richer visual content in your Telegram alerts.
4. Watermark Settings #
Watermarks help protect your images and reinforce your brand. The plugin provides several watermark-related options:
- Enable Watermark:
- Toggle to turn watermarking on or off.
- Beta Feature: Currently labeled as BETA. Use it with care as it is still under development.
- Watermark Type:
- Text: Use custom text as a watermark.
- Image: Choose an image from your media library to overlay as a watermark.
- Watermark Text Settings:
- Watermark Text: By default, it pulls your site’s domain name, but you can customize it to display any text.
- Watermark Text Size: Adjust the size of the watermark text using a range selector (from 10 to 250 pixels).
- Font Color: Select a color for the watermark text using a color picker.
- Watermark Image Settings (if Image type is selected):
- Watermark Image: Select an image from your media library to use as the watermark.
- Clear Watermark Image: Option to remove any selected watermark image.
- Preview: A preview box displays how the watermark appears on a sample background image.
- Watermark General Settings:
- Watermark Position: Choose where the watermark appears on the image (e.g., top-left, center-right, bottom-right, etc.).
- Watermark Opacity: Use a range slider to set the transparency of the watermark (from 0% to 100%).
- Watermark Size: Adjust the overall size (scaling) of the watermark as a percentage (from 1% to 100%).
Best Practices #
- Budget Management:
- Enabling features such as additional images or enhanced optimization may increase processing time and cost. Choose these options based on your performance needs and budget constraints.
- Branding Consistency:
- Use the watermark options to ensure that every image you publish carries your brand identity. Experiment with text versus image watermarks to find the best balance between aesthetics and protection.
- Testing:
- Use the preview features to test how your selected settings (including watermarks) will look on a sample background before applying them site-wide.
Summary #
By using the Additional Image Options, you can further tailor the visual output to match your brand and content strategy. Adjusting image optimization, generating extra images, and customizing watermark properties allow you to enhance both the performance and the protection of your media. Always test your settings to strike the right balance between quality and cost.
For more detailed instructions on each feature or troubleshooting tips, please refer to the full support documentation or contact our support team.


